6. IMAS
Integrated Modelling & Analysis Suite (IMAS) is the infrastructure used to build the SDP. To use IMAS on SDP, one should load the IMAS module.
[xiangliu@localhost ~] module load IMAS
6.1. Data Dictionary
Data dictionary (DD) is the basis of IMAS, which describes the physical data model for tokamak devices. To view its documentation, type dd_doc in the terminal. You can also view the HTML documentation hosted on the SDP Website.
6.2. IMAS Database
The IMAS database can be managed by using the imasdb command. Type imasdb -h for help. Creation of a database locally is quite easy, simply as imasdb test, which creates a database named “test” located at “$HOME/public/imasdb/test/3/0”. One should not care about the exact location of the database location, since the IMAS API will automatically handle this. To access the database the “username” (typically your SDP username for local database), the “database name” (here “test”), and the “IMAS major version string” (here ‘3’) must be provided to exactly locate the database.
Hint
If you want to access the public shared database, the “username” should be ‘public’.
Type imasdb -l to list all the available IMAS databases.
[xiangliu@localhost ~]$ imasdb -h
Create MDSPLUS specific directory tree <treename>/$IMAS_MAJOR_VERSION or 'default'.

imasdb [command]                    create default tree or specify <command>.

Commands:
    [treename]                    create path for <treename>.
                                    set to a /full/path to override the prefix ~/public.
    -r|--remove <treename>        rmdir <treename>/$IMAS_VERSION (if empty).
    -R|--remove-hard <treename>   rm -rf <treename>$IMAS_VERSION.
    -RR|--remove-all <treename>   rm -rf <treename>.
    -l|--list                     list created trees.
    -L|--list-more [treename]     list all dir (or dirs for one <treename>).
    -v|--version                  print version information.
    -h|--help                     this help message.

[xiangliu@localhost ~]$ imasdb test
[xiangliu@localhost ~]$ imasdb -l
/home/xiangliu/public/imasdb/test/3/0
6.3. IMAS Examples
IMAS examples are good tutorials to learn how to use IMAS’s user access layer (UAL). Copy the IMAS examples into your home directory by using cp -rf /work/ITER/IMAS/shared/imasexamples ~/. Or you can also copy the corresponding codes in this tutorial, create and paste it in the corresponding IDE.
Warning
Before moving on, please make sure you have the corresponding Programming IDE been configured, and you have already created an IMAS database named test (see IMAS Database). If the test database is not created by imasdb command in your local home directory, the following examples will show an error code complaining that Error creating new file.
6.3.1. MATLAB Examples
Start a terminal, navigate to ~/imasexamples/matlab and open MATLAB.
[xiangliu@localhost ~]$ cd ~/imasexamples/matlab/
[xiangliu@localhost matlab]$ matlab
We see two example files in the Current Folder panel or window if undocked: test_put.m (write data into the imas database) and test_get.m (read data from the imas database). You should firstly run test_put.m. The detailed explanation is specified for each line.
%% Create IMAS database
ctx = imas_create_env(...
    'ids',... % normally 'ids', keep it not changed.
    12,... % the shot number.
    1,... % the run number of this shot, a positive integer, normally 1 if there is only one run.
    12,... % reference shot number.
    1,... % reference run number.
    getenv('USER'),... % specify whether this is a public or private database. private: your user name; public: 'public'
    'test',... % the database name
    '3'); % the major version of the IMAS, echo $IMAS_VERSION for details
if ctx < 0 % the error code is a negative integer
    error('Unable to open shot');
end

%% Generate IDS
m = ids_gen('magnetics'); % generate a 'magnetics' ids, refer to data dictionary for details

%% Fill the data in the generated IDS
m.ids_properties.homogeneous_time = 1; % whether the sampling time is homogeneous or not, must be filled
m.flux_loop{1}.flux.data(1) = 10.0; % set the flux_loop data at first time point
m.flux_loop{1}.flux.data(2) = 20.0; % set the flux_loop data at second time point
m.time(1) = 2.0; % set first time point
m.time(2) = 5.0; % set second time point

%% Write the IDS data into the IMAS database
ids_put(ctx, 'magnetics', m); % write the IDS data into database

%% Close the IMAS database
imas_close(ctx);
Warning
An error might occur if you use imas_open_env to open the database file when there is no database has been created. So, we use imas_create_env to open the database file.
List your private IMAS database, you’ll see the database files have been created.
[xiangliu@localhost ~]$ ll ~/public/imasdb/test/3/0/
-rw-rw-r-- 1 xiangliu imassd 44275518 Sep 30 14:26 ids_120001.characteristics
-rw-rw-r-- 1 xiangliu imassd   157328 Sep 30 14:26 ids_120001.datafile
-rw-rw-r-- 1 xiangliu imassd 37950976 Sep 30 14:26 ids_120001.tree
Now you can run the test_get.m script to read the data you just wrote in the database.
% Open database
ctx = imas_open_env('ids',12,1,getenv('USER'),'test','3');
if ctx < 0
    error('Unable to open shot');
end

%% Read the ids from the database
m = ids_get(ctx, 'magnetics');

%% Display the ids data
disp(m.ids_properties);
disp(m.time);
disp(m.flux_loop{1}.flux.data);

%% Close the database
imas_close(ctx);
In the Command Window, you’ll see the outputs as follows:
>> test_get
         comment: ''
homogeneous_time: 1
          source: ''
        provider: ''
   creation_date: ''
     version_put: [1x1 struct]
      provenance: [1x1 struct]

 2
 5

10
20

>>
Quite simple, right? This is just what IMAS is designed to do: simplification of data exchange and IO operation.
6.3.2. Python Examples
Different from MATLAB, The UAL for Python is programmed with object-oriented method, which means you’ll operate data within class instead of using functions or methods to manipulate data directly (like UAL for MATLAB, see MATLAB Examples).
There are quite many examples for Python, two simple scripts (put_pf.py and get_pf.py) will be addressed here. Start a terminal, navigate to ~/imasexamples/python and type vi put_pf.py to see the source code.
import imas  # simply import imas package to start
import os  # used to get environment variable

# # get database related information
user_name = os.environ['USER']  # this is a private database, so your user name is used
database_name = 'test'  # the database name
imas_version = '3'  # you can also use os.environ['IMAS_VERSION'][:1] to get IMAS major version

# # initialize an ids instance
ids = imas.ids(
    12,  # shot number
    1,  # run number
    12,  # reference shot number
    1)  # reference run number

# # create or open database
ids.create_env(user_name, database_name, imas_version)
if ids.isConnected():
    print('create OK!')
else:
    raise IOError('create or open database FAILED!')

# # fill the ids data, refer to data dictionary for structure of pf_active ids.
ids.pf_active.ids_properties.homogeneous_time = 0  # Mandatory to define this property
ids.pf_active.ids_properties.comment = 'Test data'

ids.pf_active.coil.resize(2)
ids.pf_active.coil[0].name = 'COIL 1A'
ids.pf_active.coil[1].name = 'COIL 2B'

number = 10  # number of elements
ids.pf_active.coil[0].current.data.resize(number)
ids.pf_active.coil[0].current.time.resize(number)
for i in range(number):
    ids.pf_active.coil[0].current.data[i] = 2 * i
    ids.pf_active.coil[0].current.time[i] = i

number = number + 2
ids.pf_active.coil[1].current.data.resize(number)
ids.pf_active.coil[1].current.time.resize(number)
for i in range(number):
    ids.pf_active.coil[1].current.data[i] = 2 * i + 10
    ids.pf_active.coil[1].current.time[i] = i + number

# # write ids data into the database
ids.pf_active.put()

# # close the database
ids.close()
Type python3 put_pf.py to write pf_active data into the imas database.
Warning
Use python3 instead of system’s python (will direct to python 3.6), since IMAS was build with compiled python 3.9. Type module list to see the loaded python module.
[xiangliu@localhost ~] python3 put_pf.py
create OK!
============================
class coilObj
Attribute name: COIL 2B
Attribute identifier:
Attribute function
        class function
Attribute resistance: -9e+40
Attribute resistance_error_upper: -9e+40
Attribute resistance_error_lower: -9e+40
Attribute resistance_additional
...
python program over
get_pf.py is used to read the pf_active data from the imas database. Type vi get_pf.py to see the commented source code.
import imas  # simply import imas package to start
import os  # used to get environment variable

# # get database related information
user_name = os.environ['USER']  # this is a private database, so your user name is used
database_name = 'test'  # the database name
imas_version = '3'  # you can also use os.environ['IMAS_VERSION'][:1] to get IMAS major version

# # initialize an ids instance
ids = imas.ids(
    12,  # shot number
    1,  # run number
    12,  # reference shot number
    1)  # reference run number

# # open database
ids.open_env(user_name, database_name, imas_version)
if ids.isConnected():
    print('create OK!')
else:
    raise IOError('create or open database FAILED!')

# # read data from the database
ids.pf_active.get()

# # print the ids data
print('========================================================')
print('ids_properties=')
print('   ids.pf_active.ids_properties.comment = ' + ids.pf_active.ids_properties.comment)
print('   ids.pf_active.ids_properties.homogeneous_time = ' + str(ids.pf_active.ids_properties.homogeneous_time))

print('========================================================')
print('COILS')
print('========================================================')

for iCoil in range(len(ids.pf_active.coil)):
    print('coil[' + str(iCoil) + '].name' + ids.pf_active.coil[iCoil].name)
    print('coil[' + str(iCoil) + '].current.data:')
    print(ids.pf_active.coil[iCoil].current.data)
    print('coil[' + str(iCoil) + '].current.time:')
    print(ids.pf_active.coil[iCoil].current.time)
    print('-------------')

# # close the database
ids.close()
Now, you can run python3 get_pf.py to load and display the data of the pf_active data.
[xiangliu@localhost ~] python3 get_pf.py
open OK!
========================================================
ids_properties=
my_ids_obj.pf_active.ids_properties.comment = Test data
my_ids_obj.pf_active.ids_properties.homogeneous_time = 0
========================================================
COILS
========================================================
coil[0].nameCOIL 1A
coil[0].current.data:
[ 0.  2.  4.  6.  8. 10. 12. 14. 16. 18.]
coil[0].current.time:
[0. 1. 2. 3. 4. 5. 6. 7. 8. 9.]
-------------
coil[1].nameCOIL 2B
coil[1].current.data:
[10. 12. 14. 16. 18. 20. 22. 24. 26. 28. 30. 32.]
coil[1].current.time:
[12. 13. 14. 15. 16. 17. 18. 19. 20. 21. 22. 23.]
-------------
Now you should understand how to write and read data with imas package. The other examples generally do the similar thing, except that different ids have been used. So, the understanding of the Data Dictionary is quite important when you use IMAS’s UAL.
6.3.3. C++ Examples
[xiangliu@localhost ~] cd ~/imasexamples/cpp
[xiangliu@localhost ~] make
[xiangliu@localhost ~] ./test_magnetics_put
[xiangliu@localhost ~] ./test_magnetics_get
6.3.4. Fortran Examples
[xiangliu@localhost ~] cd ~/imasexamples/Fortran
[xiangliu@localhost ~] make
[xiangliu@localhost ~] ./gfortran_test_pf_put
6.4. Data Visualization
6.4.1. IMASViz
IMASViz is the official data visualization tool for IMAS Database. To use this tool simply run the bash below.
[xiangliu@localhost ~] module load Viz
[xiangliu@localhost ~] viz
This should open a GUI to plot the data.
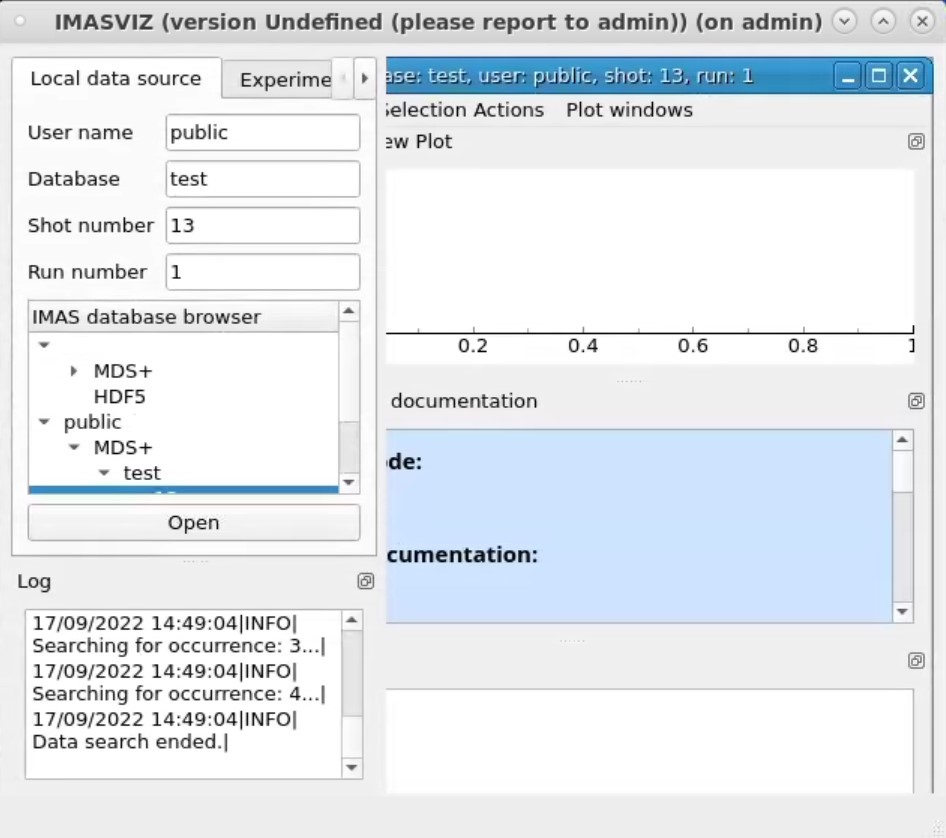
We see that in the database browser, all the available databases are shown. Navigate and select the “User name”, “Database”, “Shot number”, and “Run number”. Double click “Run number” to automatically fill the information above the database browser. Then click “Open” to load the ids in the right panel.
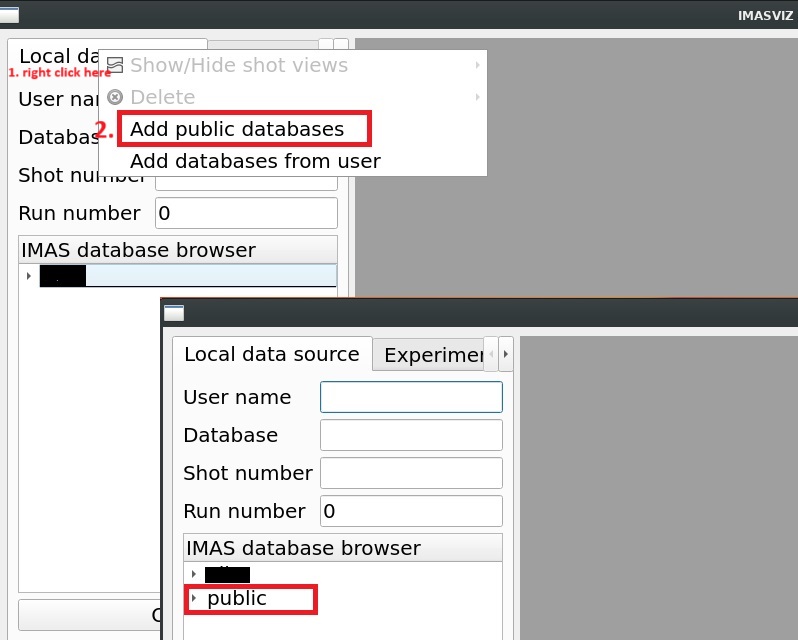
If you don’t see public database in the IMAS database browser, right click the Local data source and left click Add public databases. Then you’ll see public database in the browser.
One can view the documentation for more details.